Link every worksheet to a Master Sheet in Excel (10 Levels)
Last updated on April 19, 2024 ByVictor Chan
Are you tired of constantly clicking through Excel sheets to find the one you need? Most Excel users just click through their sheets like this, but that can be frustrating and really slow down your workflow. This guide will show you a game-changing solution that will transform the way you navigate your Excel files.
You'll learn how to create a customized master sheet that gives you a comprehensive, at-a-glance view of all your worksheets. With just a click, you'll be able to jump to any worksheet in your workbook. But that's not all. You'll also learn how to customize your master sheet with different colors and layouts to match your personal style.
This guide will take you step-by-step through the process of creating the master sheet from scratch using Excel VBA, so you can learn how to build similar solutions yourself. It's organized into levels, starting with beginner concepts and progressively advancing.
You can also watch my full video tutorial on YouTube here.
Download FREE Excel Workbook
Step 1: Sign up for free Click Here
Step 2: Log in for access Click Here
Step 3: Download file Master-Sheet-VBA-Levels-1-to-10.zip
Are you new to Excel VBA Macros?
• Find out how to enable and disable macros in Excel with this tutorial
• Save time and effort by copying VBA macros from one workbook to another with these instructions
Level 1: Excel's Built-in Navigation Pane

1. If you have Excel 365, go to the View tab > Show group > click on Navigation
2. The Navigation Pane will appear, likely docked on the right side
3. To navigate, click on a sheet name to jump to that sheet
4. Click on the arrow next to a sheet to expand/collapse its objects
5. Click on an object like an image or cell to select it
6. Right click on a sheet to bring up the context menu (rename, delete, hide)

Pros:
You can click on the Navigation pane to move it around and dock it in different places
Allows you to search for objects by name
Shows all objects on all sheets
Cons:
Only available in newer Excel versions
Pane gets cluttered with many sheets/objects
Disappears when workbook is closed so you have to reopen it
Cannot customize appearance or embed it in a worksheet
Level 2: Creating a Basic Master Sheet Manually

1. Add a new sheet and rename it to "Master Sheet"
2. Type "Master Sheet" in cell B2 and make it the header
Bold, center across columns, add borders to the top and bottom, increase font size
3. In the cells below, type sheet numbers 1, 2, 3, etc.
Center align, add borders/fill colors
4. Next to each number, type the corresponding sheet name
5. To add a hyperlink to a sheet:
Enter the text “Link”
Right-click the cell and select Hyperlink
Choose "Place in This Document"
Select the respective sheet name and click OK
Or use the keyboard shortcut:
- Select the cell
- Press Ctrl + K to open the Hyperlink dialog directly
- Proceed to link to the sheet name
Pros:
Quick way to set up a small number of sheets (4-5)
Cons:
Tedious process for linking more sheets manually
Risk of linking to wrong sheet by mistake
Need to manually update links if sheets added/removed/renamed
Level 3: Using the HYPERLINK Function for Efficiency

Here are instructions for adding a hyperlink formula to the cell D4, the first in the column of links, so you can then fill down the formula to every row that has a sheet name.
1. In the cell D4, enter the formula:
= HYPERLINK("#'" & C4 & "'!” & “A1", "Link")
2. This combines:
# to refer to the current workbook
'SheetName' from cell C4
!A1 to link to cell A1 on the sheet we are linking to
3. Fill/Copy down this formula in column D to generate links for all sheets in Column C
4. Now you can click on each "Link" cell to go to that sheet
Pros:
Much faster than manual linking for many sheets
Cons:
Hyperlinks break if sheet names changed
Need to manually update list when adding/removing sheets
Level 4: Introducing Excel VBA for Automation
From Level 4 to Level 10, we delve into using Visual Basic for Applications (VBA) to build a Master Sheet solution that not only automates data management but can also be reused in any Excel workbook. VBA, which stands for Visual Basic for Applications, is available right within Excel and allows for robust customization and automation of tasks. You don’t need to install any extra add-ins or download any code packages.
Developing an Automated Master Sheet
The real power of VBA comes into play when we automate tasks that are typically manual and time-consuming. For instance, consider the scenario where you have a master sheet that links to 20, 50, or even 100 other worksheets.
By implementing VBA, you can ensure that any changes like renaming a sheet, adding a new sheet, or deleting an existing one are automatically updated in your master sheet without any manual intervention.
Here is an overview of the Master Sheet design elements.

Here’s how you can set up and benefit from an automated master sheet:
1. Initial Setup:
Create a Master Sheet: The first step in our VBA script ensures the master sheet is set up properly and placed in the first position in the workbook.
Adjust Layout: Automatically adjust the row heights and column widths to ensure the master sheet is easy to read and navigate.
2. Automate Sheet Listing:
Generate Sheet List: A subroutine called Create_SheetList dynamically pulls in all the names of the sheets in the workbook, starting with the first sheet that is not the master sheet and continuing sequentially. The script formats this list in a designated area on the master sheet, wrapping text and adjusting columns as necessary.
Format Dynamically: Apply consistent formatting across all listed sheets to maintain a uniform look. This includes setting background colors, hyperlink styles, and text formatting.
3. Dynamic Updates:
Automatic: When a user activates the Master Sheet, the VBA code is immediately run through an event procedure. This means that the master sheet list is automatically updated for any sheet that is added, renamed, or deleted.
Back Navigation: We add back navigation buttons on every sheet (except the master sheet) to allow users to easily navigate back to the master sheet from anywhere in the workbook.

4. Customization:
User Preferences: The code allows users to modify the appearance of the master sheet, such as color schemes and layout, to match personal preferences or corporate branding.
Optional Feature: I have included a toggle feature that can display or hide the detailed specifications of the master sheet setup, useful for troubleshooting or detailed reviews.

5. Sharing the Master Sheet:
Copy to New Workbooks: The master sheet can be easily copied to any new workbook, so you can replicate the automated functionality without the need to rebuild from scratch.
Share and Collaborate: Share the automated master sheet with colleagues or integrate it into other projects, so everyone can benefit from streamlined data management. Note: the Master Sheet relies on VBA so it does not work on Excel for the web.
Looking ahead
By Level 10, you’ll understand how to leverage VBA to create a Master Sheet that not only simplifies workbook navigation but also enhances productivity through automation. Let’s proceed with setting up the code outline.
Level 5: Setting Up the VBA Code Outline
It helps to have a clear outline for the steps we will take when updating the Master Sheet. The way this works is that we use a Worksheet Activate event procedure that runs when the user activates the Master Sheet. This calls the main procedure, which then calls sub procedures that perform specific tasks in sequence to update the Master Sheet.
1. Create a new Excel file and Save As a Macro-Enabled Workbook
2. Go to Developer Tab > Visual Basic (or Alt+F11 shortcut)
3. In VBE window, rename Sheet1 code name to something like "MasterSheet"
4. Edit the code of the MasterSheet and add the Worksheet Activate event procedure. This runs when the user activates the MasterSheet.
Here’s the code for the Worksheet Activate event procedure:
[VBA Code Box]
''''''''''''''''''''''''''''''''''''''''''''''''''''''''''''''''''''''''''''''''''''''''''''
' WORKSHEET ACTIVATE EVENT PROCEDURE
'
''''''''''''''''''''''''''''''''''''''''''''''''''''''''''''''''''''''''''''''''''''''''''''

Dim wsMaster As Worksheet                   ' Note: can remove this line, it's not needed

Private Sub Worksheet_Activate()
    Application.ScreenUpdating = False      ' Don't show screen updates
    Call Update_Master_Sheet                ' Call the MAIN PROCEDURE
    Me.Cells(sRow, sCol).Select             ' Select first cell in sheet list
    ActiveWindow.DisplayHeadings = False    ' Hide row and column headings
    Application.ScreenUpdating = True       ' Do show screen udpates
End Sub
5. Then add this outline for the main procedure that updates the master sheet:
[VBA Code Box]
''''''''''''''''''''''''''''''''''''''''''''''''''''''''''''''''''''''''''''''''''''''''''''
' MAIN PROCEDURE
'
''''''''''''''''''''''''''''''''''''''''''''''''''''''''''''''''''''''''''''''''''''''''''''
Sub Update_Master_Sheet()

    Call Create_Master_Sheet

    Call Set_Up_Master_Sheet_Header

    Call Create_Sheet_List

    Call Update_Master_Header_Format

    Call Add_Navigation_Buttons

    If msDisplaySpecs = True Then Call Display_Textbox_With_Specifications

End Sub
Level 6: Streamlining Code Testing with Bookmarks
Here’s a method that can speed up testing the VBA code. When you write a new macro you’ll often need to try it, find out bugs, tweak for changes, make updates, and so on. And if your code gets longer than a few pages, it becomes harder to find the right section.
By using a bookmark in the VB Editor, you can reduce the amount of time it takes for you to jump to the VBA code you want to run. Here’s how to do it:
1. In the VBE, go to View > Toolbars > Customize

2. Create a new toolbar and add these buttons:
Edit category: Toggle Bookmark, Next Bookmark
Run category: Run

3. Toggle a bookmark on the procedure you're testing

4. Use Next Bookmark to jump to that procedure
5. Click Run to test the procedure
To watch how this works in practice, watch my YouTube video Link every worksheet to a Master Sheet in Excel (10 Levels).
Level 7: Building the Supporting Procedures

Create_Master_Sheet:
1. Check if sheet is named "Master"
2. Move Master sheet to first position
3. Clear all cells and delete existing shapes
4. Set background color
5. Set row heights and column widths
Here’s the full VBA code:
[VBA Code Box]
Sub Create_Sheet_List()

Dim sheetIndex As Integer   ' To loop through all sheets (include Master Sheet)
Dim sheetCounter As Integer ' To count sheets we want to list (exclude Master Sheet)
Dim linkAddr As String      ' Hyperlink address
Dim linkText As String      ' Hyperlink text
Dim rowNumber As Integer    ' To count rows for updating values
Dim colNumber As Integer    ' To count columns for updating values
Dim colCount As Integer     ' To count columns for formatting
Dim lastRow As Long         ' To help with formatting

    ' Set initial numbers
    sheetCounter = 1
    rowNumber = sRow
    colNumber = sCol

    ' Loop through all sheets and list their names based on visibility
    For sheetIndex = 1 To ThisWorkbook.Sheets.Count

        With ThisWorkbook.Sheets(sheetIndex)
            ' List the sheet if the name is not "Master"
            ' and either "showHidden" is true or the sheet is visible
            If .Name <> "Master" And _
                (showHidden Or .Visible = xlSheetVisible) Then

                    ' Set Sheet Number
                    Me.Cells(rowNumber, colNumber).Value = sheetCounter

                    ' Set Sheet Hyperlink
                    linkAddr = "'" & .Name & "'!A1"
                    linkText = .Name

                    Me.Hyperlinks.Add _
                        Anchor:=Me.Cells(rowNumber, colNumber + 1), _
                        Address:="", _
                        SubAddress:=linkAddr, _
                        TextToDisplay:=linkText

                    rowNumber = rowNumber + 1
                    sheetCounter = sheetCounter + 1

                    ' Check if we've hit the MaxRows limit
                    If rowNumber >= maxRows + sRow Then
                        ' Set row number back to first row
                        rowNumber = sRow

                        ' If we haven't reached the last sheet then
                        ' set the next column to be 3 columns to the right
                        If sheetCounter <> ThisWorkbook.Sheets.Count Then
                            colNumber = colNumber + 3
                        End If
                    End If

            End If

        End With

    Next sheetIndex

    ' FORMATTING
    colCount = sCol
    Do
        ' Format Sheet List numbers
        With Me.Cells(sRow, colCount).CurrentRegion.Columns(1)
            .Interior.Color = slNumbBackColor
            With .Font
                .Color = slNumbTextColor
                .Bold = True
                .Size = slNumberFontSize
                .Name = slNumberFont
            End With
            .VerticalAlignment = xlCenter
            .HorizontalAlignment = xlCenter
            With .Borders
                .LineStyle = xlContinuous
                .Color = slNumbBordColor
                .Weight = 4
            End With
            .AutoFit
            .ColumnWidth = .ColumnWidth + slNumberColPadding
        End With

        ' Format Sheet List names
        With Me.Cells(sRow, colCount).CurrentRegion.Columns(2)
            .Interior.Color = slNameBackColor
            With .Font
                .Color = slNameTextColor
                .Bold = True
                .Size = slNameFontSize
                .Name = slNameFont
            End With
            .VerticalAlignment = xlCenter
            .InsertIndent slNameIndent
            With .Borders
                .LineStyle = xlContinuous
                .Color = slNameBordColor
                .Weight = 4
            End With
            .AutoFit
            .ColumnWidth = .ColumnWidth + slNameColPadding
        End With

        colCount = colCount + 3

    Loop Until colCount > colNumber

    ' ROW HEIGHT
    Me.Cells(sRow, sCol).CurrentRegion.Rows.RowHeight = sHeight

End Sub
Set_Up_Master_Sheet_Header:
1. Add padding rows/columns
2. Set header text value
3. Format header text font, size, color, alignment
Here’s the full VBA code:
[VBA Code Box]
Sub Set_Up_Master_Sheet_Header()

    With Me

        ' Add Top and Left Padding
        .Rows(1).RowHeight = Me.Rows(1).RowHeight + mTopPadding
        .Columns(1).ColumnWidth = Me.Columns(1).ColumnWidth + mLeftPadding

        ' Set up Master Header
        With .Cells(mRow, mCol)
            .Value = msHeadText
            .Rows(1).RowHeight = mHeight
            .VerticalAlignment = xlCenter
            With .Font
                .Name = msHeadFontName
                .Color = msHeadTextColor
                .Bold = True
                .Size = msHeadFontSize
            End With
            ' Add Bottom Padding
            .Offset(1, 0).EntireRow.RowHeight = mBottomPadding
        End With

    End With

End Sub

Create_Sheet_List:
1. Declare variables
2. Set initial sheet count, row, column
3. Loop through sheets:
Skip sheet named "Master"
Add to list if visible or ShowHidden=True
Set sheet number
Generate HYPERLINK formula
Check if max rows exceeded, start new column
4. Format sheet number elements
Background color, font, alignment, borders
5. Format sheet name elements
Background color, font, alignment, indent
Apply borders with specified color/weight
6. Set row heights for entire sheet list area
Here’s the full VBA code:
[VBA Code Box]
Sub Create_Sheet_List()

Dim sheetIndex As Integer   ' To loop through all sheets (include Master Sheet)
Dim sheetCounter As Integer ' To count sheets we want to list (exclude Master Sheet)
Dim linkAddr As String      ' Hyperlink address
Dim linkText As String      ' Hyperlink text
Dim rowNumber As Integer    ' To count rows for updating values
Dim colNumber As Integer    ' To count columns for updating values
Dim colCount As Integer     ' To count columns for formatting
Dim lastRow As Long         ' To help with formatting

    ' Set initial numbers
    sheetCounter = 1
    rowNumber = sRow
    colNumber = sCol

    ' Loop through all sheets and list their names based on visibility
    For sheetIndex = 1 To ThisWorkbook.Sheets.Count

        With ThisWorkbook.Sheets(sheetIndex)
            ' List the sheet if the name is not "Master"
            ' and either "showHidden" is true or the sheet is visible
            If .Name <> "Master" And _
                (showHidden Or .Visible = xlSheetVisible) Then

                    ' Set Sheet Number
                    Me.Cells(rowNumber, colNumber).Value = sheetCounter

                    ' Set Sheet Hyperlink
                    linkAddr = "'" & .Name & "'!A1"
                    linkText = .Name

                    Me.Hyperlinks.Add _
                        Anchor:=Me.Cells(rowNumber, colNumber + 1), _
                        Address:="", _
                        SubAddress:=linkAddr, _
                        TextToDisplay:=linkText

                    rowNumber = rowNumber + 1
                    sheetCounter = sheetCounter + 1

                    ' Check if we've hit the MaxRows limit
                    If rowNumber >= maxRows + sRow Then
                        ' Set row number back to first row
                        rowNumber = sRow

                        ' If we haven't reached the last sheet then
                        ' set the next column to be 3 columns to the right
                        If sheetCounter <> ThisWorkbook.Sheets.Count Then
                            colNumber = colNumber + 3
                        End If
                    End If

            End If

        End With

    Next sheetIndex

    ' FORMATTING
    colCount = sCol
    Do
        ' Format Sheet List numbers
        With Me.Cells(sRow, colCount).CurrentRegion.Columns(1)
            .Interior.Color = slNumbBackColor
            With .Font
                .Color = slNumbTextColor
                .Bold = True
                .Size = slNumberFontSize
                .Name = slNumberFont
            End With
            .VerticalAlignment = xlCenter
            .HorizontalAlignment = xlCenter
            With .Borders
                .LineStyle = xlContinuous
                .Color = slNumbBordColor
                .Weight = 4
            End With
            .AutoFit
            .ColumnWidth = .ColumnWidth + slNumberColPadding
        End With

        ' Format Sheet List names
        With Me.Cells(sRow, colCount).CurrentRegion.Columns(2)
            .Interior.Color = slNameBackColor
            With .Font
                .Color = slNameTextColor
                .Bold = True
                .Size = slNameFontSize
                .Name = slNameFont
            End With
            .VerticalAlignment = xlCenter
            .InsertIndent slNameIndent
            With .Borders
                .LineStyle = xlContinuous
                .Color = slNameBordColor
                .Weight = 4
            End With
            .AutoFit
            .ColumnWidth = .ColumnWidth + slNameColPadding
        End With

        colCount = colCount + 3

    Loop Until colCount > colNumber

    ' ROW HEIGHT
    Me.Cells(sRow, sCol).CurrentRegion.Rows.RowHeight = sHeight

End Sub

Update_Master_Header_Format:
1. Find the last used column
2. Center align header text across all columns
3. Update top and bottom border formatting
Here’s the full VBA code:
[VBA Code Box]
Sub Update_Master_Header_Format()

    Dim lastCell As Range
    Dim lastCol As Long

    ' Find the last cell
    Set lastCell = Me.Cells.Find(What:="*", After:=Me.Cells(1, 1), LookIn:=xlFormulas, LookAt:= _
    xlPart, SearchOrder:=xlByColumns, SearchDirection:=xlPrevious, MatchCase:=False)

    ' Set the last column
    lastCol = lastCell.Column

    ' Format Header
    With Me.Range(Cells(mRow, mCol), Cells(mRow, lastCol))
        .HorizontalAlignment = xlCenterAcrossSelection
        .Interior.Color = msHeadBackColor
        With .Borders(xlEdgeTop)
            .LineStyle = xlContinuous
            .Color = msHeadBordColor
            .Weight = 4
        End With
        With .Borders(xlEdgeBottom)
            .LineStyle = xlContinuous
            .Color = msHeadBordColor
            .Weight = 4
        End With
    End With

End Sub
After putting this code in, make sure you test the procedures using the bookmark method I showed in Level 6. If you need help to do this, watch my YouTube video “Link every worksheet to a Master Sheet in Excel (10 Levels)”.
Level 8: Adding Back Navigation Buttons

1. For each worksheet (except Master):
Check if navigation button already exists
If so, delete existing button
Add new button shape at specified position/size
Format button appearance (fill, line, text)
2. Assign a macro to the button's OnAction event:
GoToMasterSheet procedure to activate Master sheet
Select the first cell of the sheet list
Here’s the full VBA code for adding back navigation buttons:
[VBA Code Box]
Sub Add_Navigation_Buttons()
    Dim ws As Worksheet
    Dim btn As Shape
    Dim buttonExists As Boolean

    ' Loop through all sheets
    For Each ws In ThisWorkbook.Sheets
        ' Skip the "Master" worksheet
        If ws.Name <> "Master" Then
            ' Check if the button already exists
            buttonExists = False
            For Each btn In ws.Shapes
                If btn.Name = "btn_GoToMasterSheet" Then
                    buttonExists = True
                    ' Delete existing button
                    btn.Delete
                    Exit For
                End If
            Next btn

            ' Add the button (shape, X, Y, Width, Height)
            Set btn = ws.Shapes.AddShape(msoShapeRoundedRectangle, 5, 5, 75, 30)
            With btn
                .Name = "btn_GoToMasterSheet"
                .Fill.ForeColor.RGB = RGB(17, 113, 186) 'Blue background
                With .TextFrame.Characters
                    .Text = "Back"
                    .Font.Name = "Calibri"
                    .Font.Color = RGB(255, 255, 255) 'White text
                    .Font.Size = 14
                    .Font.Bold = True
                End With
                .Line.Visible = msoFalse
                .TextFrame2.TextRange.ParagraphFormat.Alignment = msoAlignCenter
            End With

            ' Assign macro to button
            ' Must include 'MasterSheet' sheet codename so other sheets can find the macro
            ws.Shapes("btn_GoToMasterSheet").OnAction = "MasterSheet.Go_To_Master_Sheet"
        End If
    Next ws

End Sub
And here’s the VBA code that we run when the user clicks on the Back buttons:
[VBA Code Box]
Sub Go_To_Master_Sheet()
    ThisWorkbook.Sheets("Master").Activate
    ThisWorkbook.Sheets("Master").Range("A1").Select
End Sub
Level 9: Customizing Colors and Layout

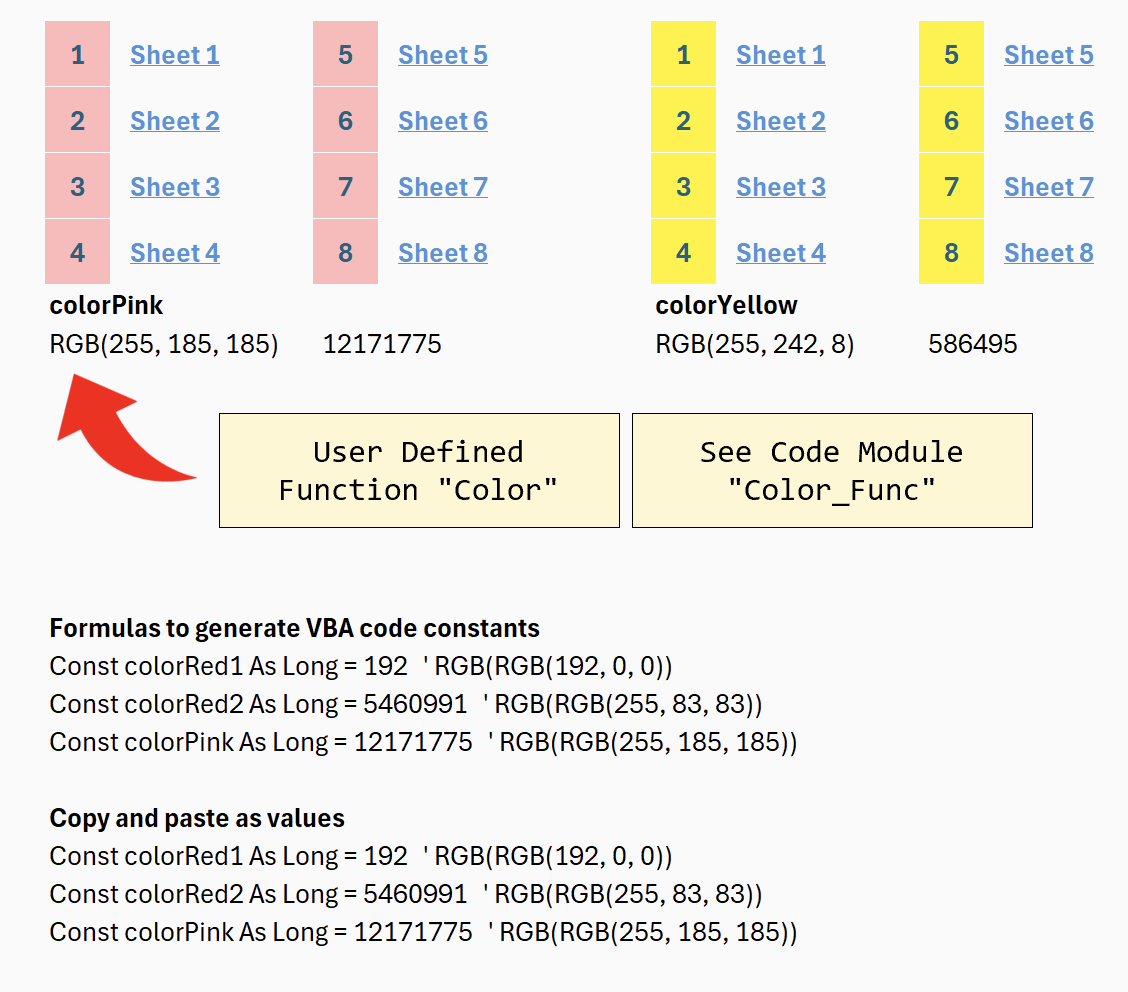
1. In the constants section at the top of the Master Sheet code window, I have listed predefined sample colors for you to use.

2. To change colors, modify the named constant values (e.g. like colorBlue1)
Use RGB format (e.g. RGB(33, 92, 152))
Or long integer values (e.g. 9985057)
3. Constants also control other formatting like:
Header text, font, size
Sheet number / name fonts, backgrounds, etc.
4. The downloadable workbook has two color galleries with sample RGB/long int values
Here’s the VBA code with the constants section at the top of the Master Sheet code window:
[VBA Code Box]
Option Explicit

' LAUNCH EXCEL PRO TIP:
'   Rename the (code name) of this sheet to 'MasterSheet'
'   so you can find it easily in the Project Window

' Note: This code will not work when copied to a separate code module.
'       Reason: the following code only works in a worksheet object
'       -   Worksheet_Activate() is a specific worksheet event procedure.
'       -   Any procedures with the keyword "me" refer to "me" as the worksheet.

' SAMPLE LIST OF COLORS
' Use xlNone for no background color
Const colorBlack As Long = 0            ' RGB(0, 0, 0)
Const colorBlue1 As Long = 9985057      ' RGB(33, 92, 152)
Const colorBlue2 As Long = 14259021     ' RGB(77, 147, 217)
Const colorBlue3 As Long = 16115392     ' RGB(192, 230, 245)
Const colorBrown As Long = 32936        ' RGB(168, 128, 0)
Const colorGray1 As Long = 5855577      ' RGB(89, 89, 89)
Const colorGray2 As Long = 10921638     ' RGB(166, 166, 166)
Const colorGray3 As Long = 15263976     ' RGB(232, 232, 232)
Const colorGray4 As Long = 16448250     ' RGB(250, 250, 250)
Const colorGreen1 As Long = 3057486     ' RGB(78, 167, 46)
Const colorGreen2 As Long = 5886791     ' RGB(71, 211, 89)
Const colorGreen3 As Long = 13168833    ' RGB(193, 240, 200)
Const colorOrange1 As Long = 573950     ' RGB(254, 193, 8)
Const colorOrange2 As Long = 578303     ' RGB(255, 210, 8)
Const colorPink As Long = 12171775      ' RGB(255, 185, 185)
Const colorPurple1 As Long = 9644960    ' RGB(160, 43, 147)
Const colorPurple2 As Long = 13463000   ' RGB(216, 109, 205)
Const colorPurple3 As Long = 15716082   ' RGB(242, 206, 239)
Const colorRed1 As Long = 192           ' RGB(192, 0, 0)
Const colorRed2 As Long = 5460991       ' RGB(255, 83, 83)
Const colorYellow As Long = 586495      ' RGB(255, 242, 8)
Const colorWhite As Long = 16777215     ' RGB(255, 216, 93)

'TIP: use the Immediate Window (CTRL + G) to convert RGB to Long
'       Step 1: debug.print RGB(77, 147, 217)
'       Step 2: press enter to get result 14259021

''''''''''''''''''''''''''''''''''''''''''''''''''''''''''''''''''''''''''''''''''''''''''''
' MASTER SHEET ELEMENT
'
''''''''''''''''''''''''''''''''''''''''''''''''''''''''''''''''''''''''''''''''''''''''''''
Const rHeight As Single = 38                ' Master Sheet Row Height
Const cWidth As Single = 5.5                ' Master Sheet Col Width
Const msBackColor As Long = xlNone          ' Master Sheet Background (xlNone = transparent)
Const msDisplaySpecs As Boolean = False      ' Display Specifications (True = Yes, False = No)


''''''''''''''''''''''''''''''''''''''''''''''''''''''''''''''''''''''''''''''''''''''''''''
' MASTER SHEET HEADER ELEMENT
'
''''''''''''''''''''''''''''''''''''''''''''''''''''''''''''''''''''''''''''''''''''''''''''
Const msHeadText As String = "Master Sheet"
Const msHeadFontSize As Single = 22
Const msHeadFontName As String = "Aptos Black"
'Font ideas: Aptos Narrow, Aptos Black, Arial Black

Const mRow As Integer = 2                   ' Master Header Row
Const mCol As Integer = 2                   ' Master Header Column
Const mHeight As Single = 58                ' Master Header Row Height
Const mTopPadding As Single = 8             ' Master Header Row Top Padding
Const mBottomPadding As Single = 34         ' Master Header Row Bottom Padding
Const mLeftPadding As Single = 8            ' Master Header Row Left Padding

Const msHeadBackColor As Long = colorWhite
Const msHeadTextColor As Long = colorBlack
Const msHeadBordColor As Long = colorBlack


''''''''''''''''''''''''''''''''''''''''''''''''''''''''''''''''''''''''''''''''''''''''''''
' SHEET LIST MAIN ELEMENTS
'
''''''''''''''''''''''''''''''''''''''''''''''''''''''''''''''''''''''''''''''''''''''''''''
Const showHidden As Boolean = False         ' Show Hidden Sheets (False = Hide, True = Show)
Const sRow As Integer = mRow + 2            ' Sheet List First Row (2 rows below Master)
Const sCol As Integer = mCol                ' Sheet List First Column (same as Master)
Const sHeight As Single = 38                ' Sheet List Row Height
Const maxRows As Integer = 10               ' Set max row for each column


''''''''''''''''''''''''''''''''''''''''''''''''''''''''''''''''''''''''''''''''''''''''''''
' SHEET LIST NUMBER ELEMENTS
'
''''''''''''''''''''''''''''''''''''''''''''''''''''''''''''''''''''''''''''''''''''''''''''
Const slNumberColPadding As Single = 3.5    ' Sheet List Number column width padding
Const slNumberFontSize As Single = 14       ' Sheet List Name font size
Const slNumberFont As String = "Aptos Narrow"   ' Sheet List Name font

Const slNumbBackColor As Long = colorBlue2  ' Sheet List Number Background
Const slNumbTextColor As Long = colorWhite  ' Sheet List Number Text
Const slNumbBordColor As Long = colorWhite  ' Sheet List Number Border


''''''''''''''''''''''''''''''''''''''''''''''''''''''''''''''''''''''''''''''''''''''''''''
' SHEET LIST NAME ELEMENTS
'
''''''''''''''''''''''''''''''''''''''''''''''''''''''''''''''''''''''''''''''''''''''''''''
Const slNameColPadding As Single = 4.5      ' Sheet List Name column width padding
Const slNameFontSize As Single = 14         ' Sheet List Name font size
Const slNameFont As String = "Aptos Narrow"     ' Sheet List Name font
Const slNameIndent As Integer = 1           ' Sheet List Name indent level (0 - 15)

Const slNameBackColor As Long = colorGray4  ' Sheet List Name Background
Const slNameTextColor As Long = colorBlue2  ' Sheet List Name Text
Const slNameBordColor As Long = colorGray4  ' Sheet List Name Border
Also, the User Defined Function Color() can generate RGB/long int from a cell. I included this in the downloadable workbook called “Master-Sheet-Overview.xlsm”.
Here’s the full VBA code for the User Defined Function Color():
[VBA Code Box]
Option Explicit

''''''''''''''''''''''''''''''''''''''''''''''''''''''''''''''''''''''''''''''''''''''''''''''''''''''''''''''''''''''''''''''''
'   Function            Color
'   Purpose             Determine the Background Color Of a Cell
'   @Param rng          Range to Determine Background Color of
'   @Param formatType   Default Value = 0
'                       0   Integer
'                       1   Hex
'                       2   RGB
'                       3   Excel Color Index
'   Usage               Color(A1)      -->   9507341
'                       Color(A1, 0)   -->   9507341
'                       Color(A1, 1)   -->   91120D
'                       Color(A1, 2)   -->   13, 18, 145
'                       Color(A1, 3)   -->   6
'   Source: https://stackoverflow.com/questions/24132665/return-rgb-values-from-range-interior-color-or-any-other-color-property
'   Changes:
'               Case 2 includes "RGB(" & ")"
'               Case Else converts to string
'
''''''''''''''''''''''''''''''''''''''''''''''''''''''''''''''''''''''''''''''''''''''''''''''''''''''''''''''''''''''''''''''''
Public Function Color(rng As Range, Optional formatType As Integer = 0) As Variant
    Dim colorVal As Variant
    colorVal = rng.Cells(1, 1).Interior.Color
    Select Case formatType
        Case 1
            Color = WorksheetFunction.Dec2Hex(colorVal, 6)
        Case 2
            Color = "RGB(" & (colorVal Mod 256) & ", " & ((colorVal \ 256) Mod 256) & ", " & (colorVal \ 65536) & ")"
        Case 3
            Color = rng.Cells(1, 1).Interior.ColorIndex
        Case Else
            Color = Str(colorVal)
    End Select
End Function
Conclusion
You now have five tools at your disposal for jumping between sheets in Excel: Keyboard shortcuts, the "Activate Sheet" dialog box, a VBA helper, an upgraded VBA helper, and the Watch Window. Explore these options and find the ones that work best for your needs.
Remember, Excel is full of useful tools and features that most users never use. Don’t be like them. Learn Excel VBA! It can be both fun and useful, so subscribe to my email newsletter for more awesome Excel and VBA resources.
I also have a library of videos you can watch to learn more about Excel. You’ll learn new ways to improve your spreadsheets. Here’s the link to my YouTube channel.
And if you’d like to learn Excel VBA in a structured, methodical way, I have an online course called “Launch Excel Macros & VBA School”. You can find it in the shop.
Happy Excelling!


Hi, I'm Victor!
Are you struggling with complex Excel tasks? Feeling overwhelmed by spreadsheets that are hard to use?
Many people believe mastering Excel is about learning shortcuts, functions, and formulas. But this overlooks the importance of building practical, real-world applications. It's not just about knowing the tools. It's about using them effectively.
That's where I come in. You'll get a unique perspective to Excel training from me. I have over 20 years of experience at Deloitte and two global tech companies. And I know what can make a difference in your career.
Let me help you integrate Excel into your professional life. Starting today. Read one of my articles, watch one of my videos. Then apply the new technique to your work. You'll see the difference immediately!


Discover the PROVEN Blueprint for transforming your Excel skills, supercharging your productivity, and standing out in your career! My course helps you to learn Excel VBA and save hours of time even if you have zero prior experience with programming.

Solve tricky Excel problems and take your work to the next level! Get customized solutions for your unique needs. Save time and gain insights with truly expert Excel solutions from only $97 per task.

Get a clear overview of your project progress using the Excel project timeline. Use it to communicate the big picture, track task progress, and stay on top of your project goals. Stay organized with our project timeline!

Our cheat sheets provide quick and easy reference to commonly used Excel VBA concepts and code snippets.
Unlock new levels of productivity and efficiency with our cheat sheets, and write VBA code like a pro in no time.
RECOMMENDED READING

Are you looking to upskill and stay ahead of the curve? Excel is a powerful tool that keeps growing in demand. We round up the best online courses for learning Excel.

Are you looking to up your spreadsheet game? Excel is an invaluable tool that can help you stay organized and save time. From data analysis to budgets, Excel can do it all!

Today, having Excel skills is more critical than ever. Those who know how to use Excel are more likely to find higher-paying jobs. And get promoted faster.
JOIN FREE EMAIL NEWSLETTER
Step up your Excel game! Join our free email newsletter and get updates on how to become more awesome at Excel.
© 2011-2025 Launch Excel